
Protecting Windows Virtual Desktops Session Hosts Using Azure Recovery Services Vault
In this post I will walk you through the steps to allow you to protect WVD Session Hosts while using Persistent Desktop scenarios, where backups are important since data may reside in the virtual machine itself. This also very important on some types for regulatory compliance scenarios, where for example you’re required to keep the user’s data for X amount of time.
This document will guide you through all steps for configuring backup. This capability is backed by an Azure Service called Backup and Site Recovery(OMS), amongst other features, it provides the backup/snapshot infrastructure for VMs in Azure.
In this blog post
- Creating a Recovery Services Vault
- Configuring a Backup Policy
- (Optional) Changing Recovery Services Vault Storage Replication Configuration
- Enabling Scheduled Session Host Backup
- Starting an On-Demand Session Host Backup
- Recovering a Session Host
- Considerations
- References
Creating a Recovery Services Vault
Recovery Services Vault is the key component of Backup and Site Recovery services, it is responsible for holding in a secure manner VM backups.
One key concept here is that we will have one Recovery Services Vault per region where Session Hosts are deployed, for example, if your Session Hosts for a given Host Pool are located in East US, then a vault will be required to be created in the same region (East US). We also need to pay attention to the limit of 250 server per vault, create more vaults per region as needed.
-
From Azure Portal, click on “+ Create a resource” item in the left-hand navigation pane
-
At “Search the Marketplace” field, type Backup and Site Recovery (OMS) and select it from the combo box
-
Click “Create” button
-
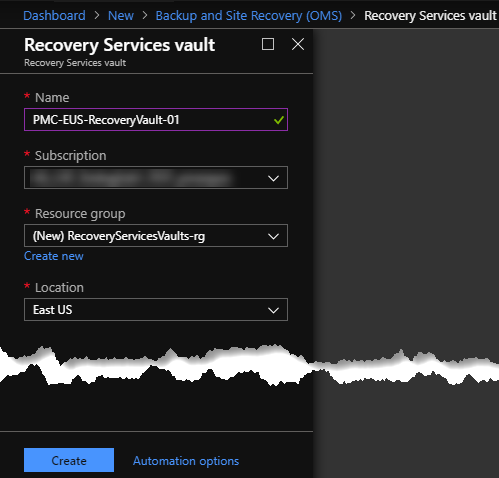
Taking into consideration the regional backups and limits, consider a good naming convention, in my example I’ll use “PMC-EUS-RecoveryVault-01” as the name of my vault.
-
Choose the Subscription, Resource Group (create a new one if needed) and Location where it will be located
-
Click “Create” button
Configuring a Backup Policy
Since different Host Pools in the same region may have different backup needs it would be a good idea that you specify one policy per Host Pool, even if they are the same to begin with, this will give you flexibility to change in the future if you decide for a different policy and avoid extra work to revisit your VMs to change the policy later.
-
Select your newly created Recovery Services Vault, in my case PMC-EUS-RecoveryVault-01 and click “Backup policies” item in the left blade pane.
-
Click “+Add” button
-
Select Azure Virtual Machine
-
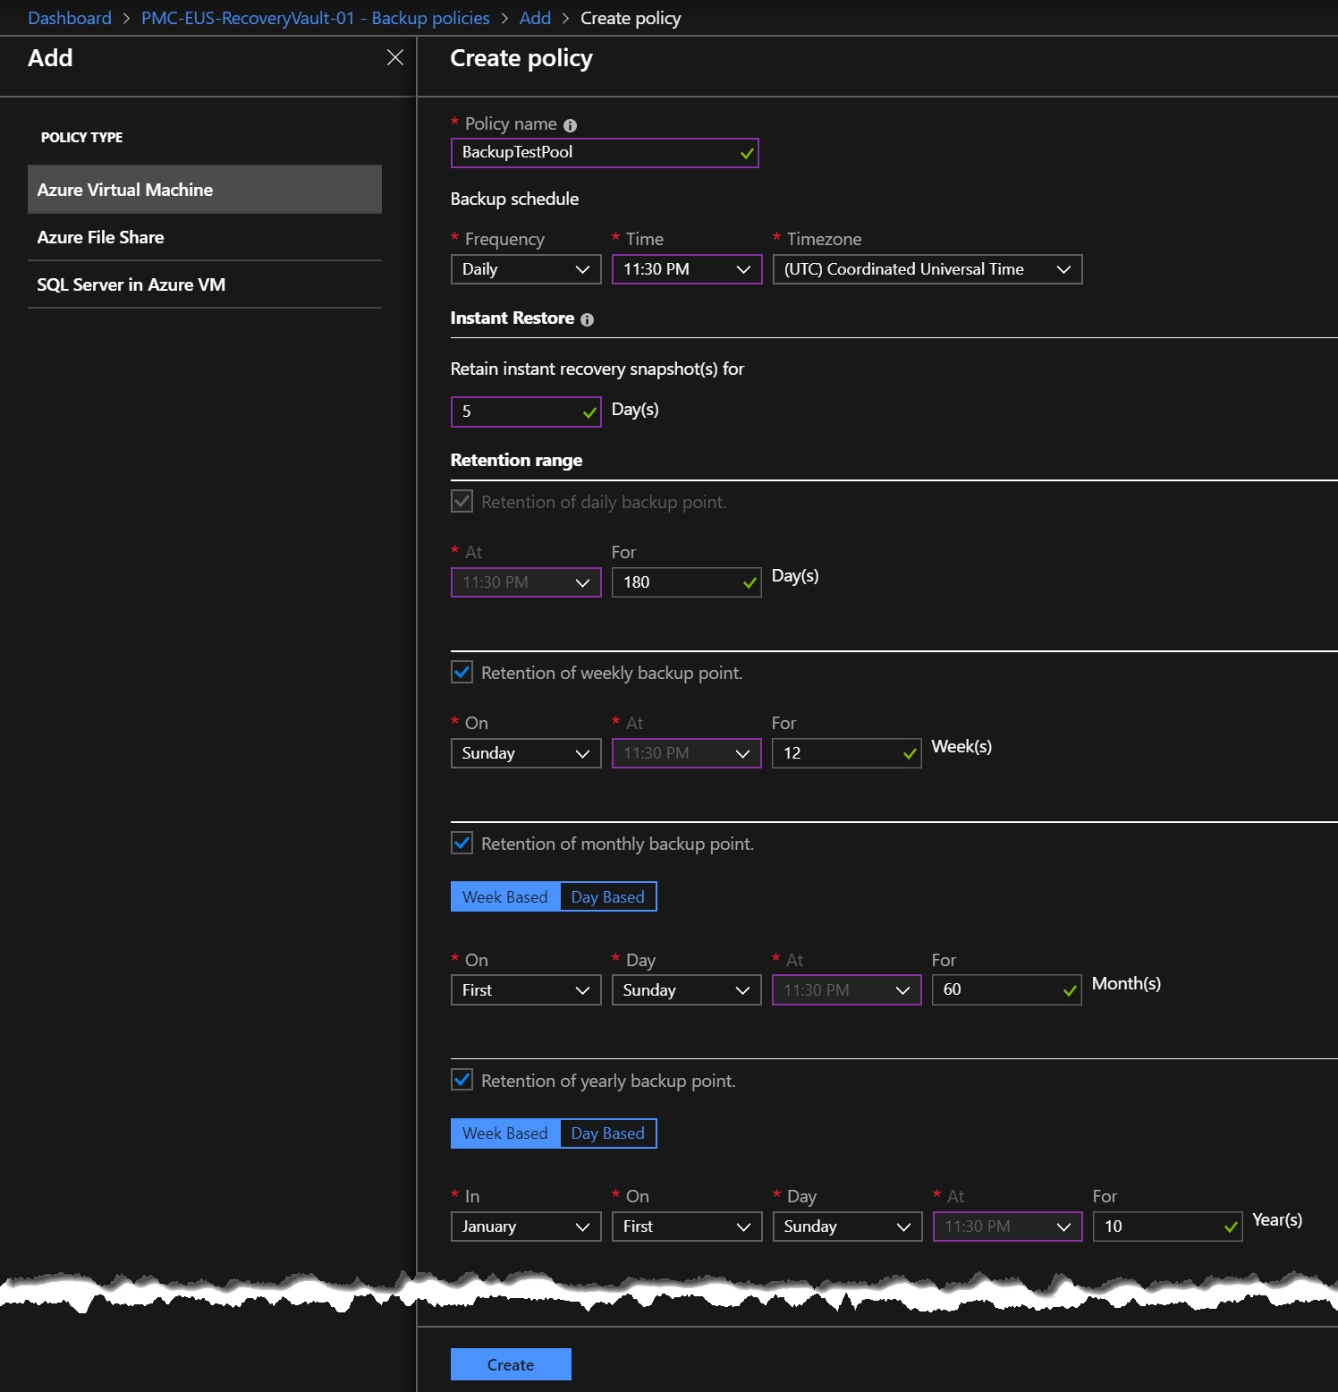
At “Policy name”, type the Host Pool name so it makes it easier for you to manage and associate with which Host Pool this is about (Notice that no special characters and spaces are allowed).
-
Regarding policies, of course each company and even Host Pools will have their own needs, this is what I’m configuring in this example:
Backup schedule
-
Frequency: Daily (Azure VMs allows one backup a day)
-
Time: 11:30 PM
-
Timezone: East US (backups will be scheduled and executed using the same timezone of the Session Hosts in this example)
Instant Restore
- Retain instant recovery snapshot(s) for: 5 Day(s) (in this case we’re allowing faster recovery within a 5 days period, more than this will recover data from the vault instead of a storage account which will take more time to complete)
Retention range
- Daily backup point
- For: 180 Day(s) (maximum limit of 9999 days)
- Retention of weekly backup point
- On: Sunday
- At: 11:30 PM
- For: 12 Week(s) (maximum limit of 5163 weeks)
- Retention of monthly backup point
- Week Based
- On: First
- Day: Sunday
- At: 11:30 PM
- For: 60 Month(s) (maximum limit of 1188 weeks)
- Retention of yearly backup point
- Week Based
- In: January
- On: First
- Day: Sunday
- At: 11:30 PM
- For: 10 Year(s) (maximum of 99 year)
-
-
Click “Create” button
(Optional) Changing Recovery Services Vault Storage Replication Configuration
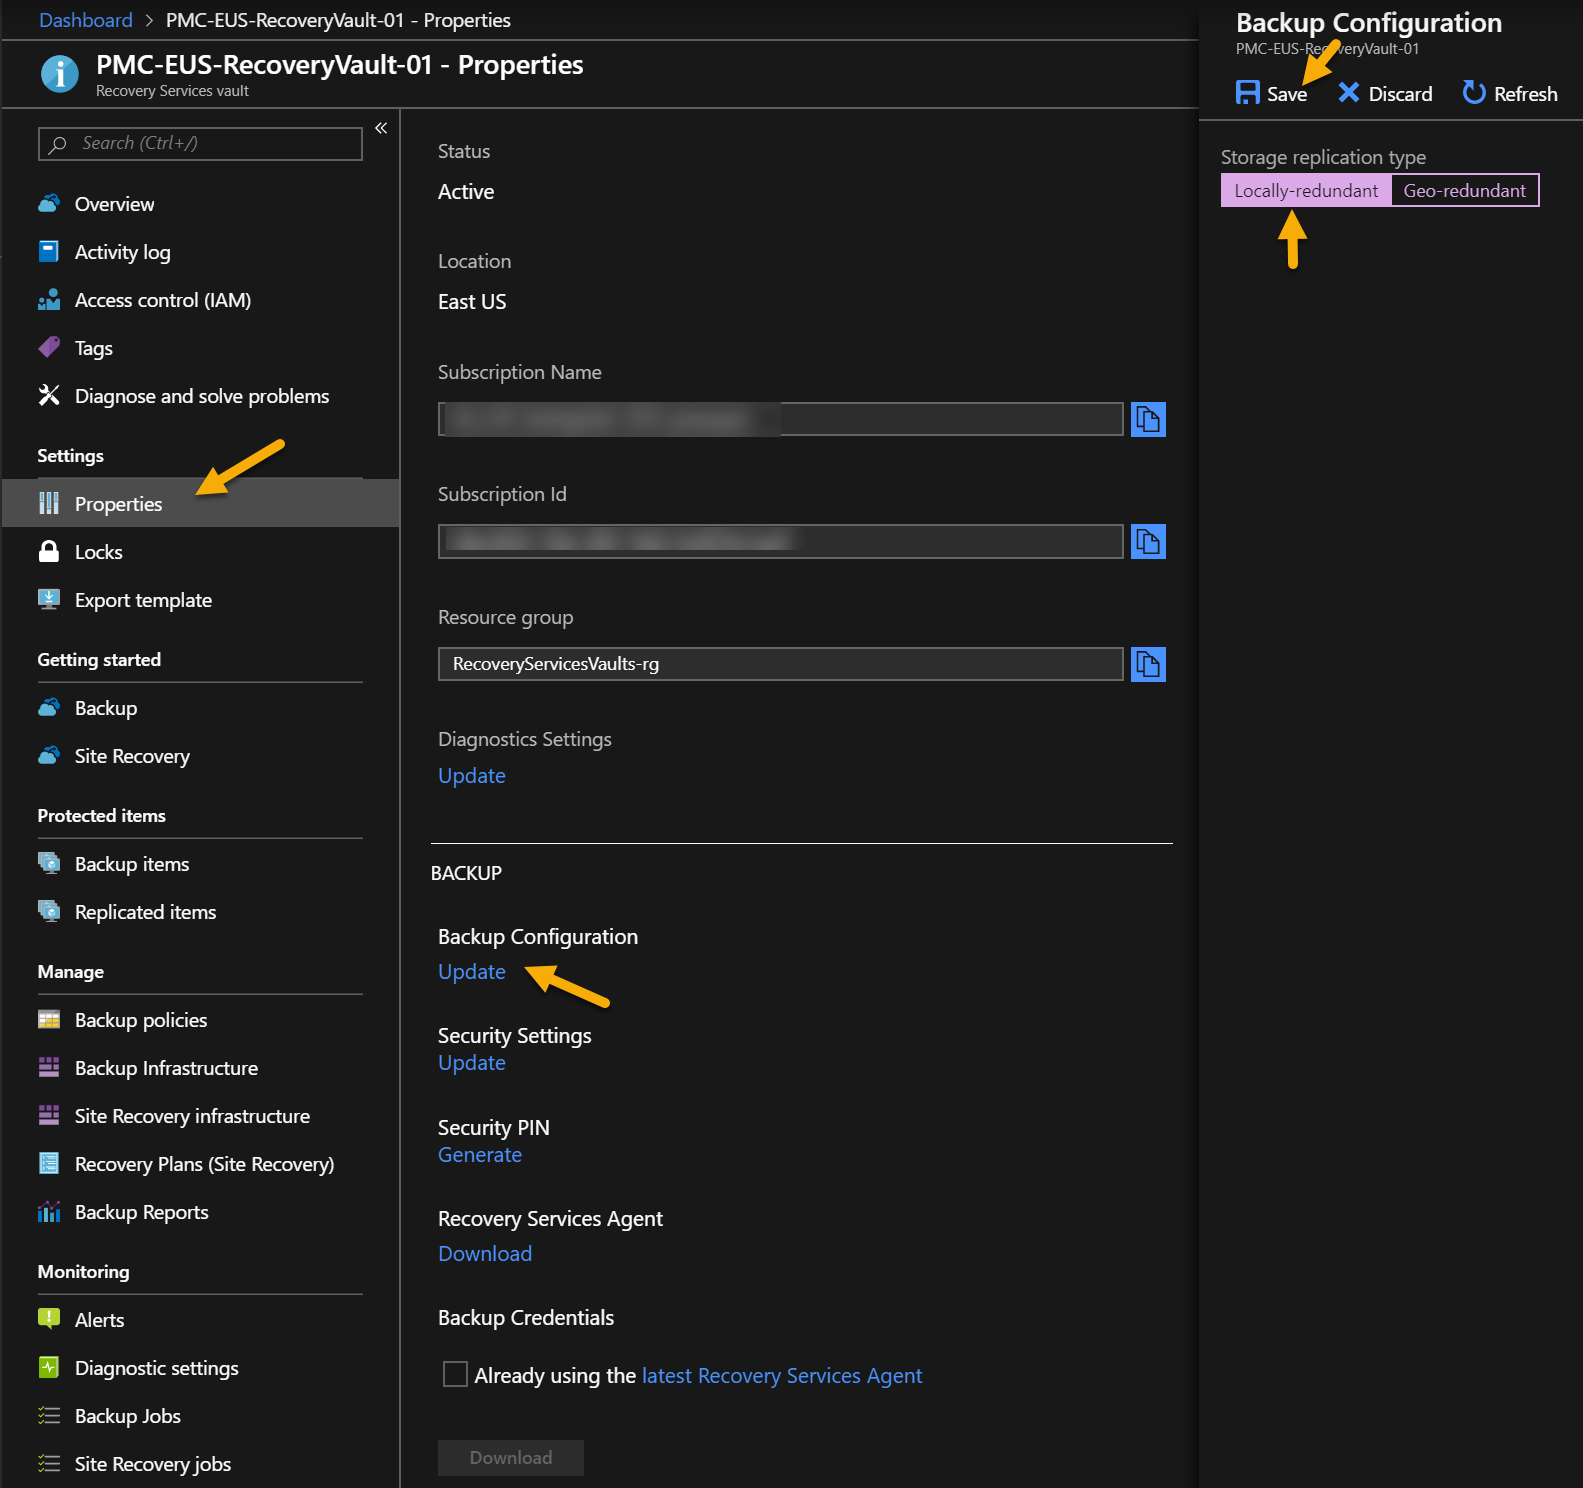
By default, backup storage replication type is set as Geo-Redundant which gives you regional failure resilience but if needed, you can change it to Locally-redundant type. Notice that this setting can be changed only while you don’t have any backup items protected to the vault. To change it for Locally-redundant setting:
-
Open your recovery services (PMC-EUS-RecoveryVault-01 in this example)
-
Click “Properties” item of Recovery Services vault blade
-
Click “Update” link under BACKUP->Backup Configuration
-
Click “Locally-redundant” on “Storage replication type”
-
Click “Save” button
Enabling Scheduled Session Host Backup
Our last step is enabling automatic backups based on a specific backup policy on each Session Host. Although this can be done through the Portal, we’re presenting a method with a PowerShell script that will allow you to enable backup to all Session Hosts automatically within a Host Pool, also it will allow you to re-execute the script and enable it to new Session Hosts recently added to the pool that does not have backup enabled yet.
Using the PowerShell Script
Pre-Requisites
-
Windows PowerShell 5.0 and 5.1
-
Az PowerShell module 1.6 or greater
-
Microsoft.RDInfra.RDPowerShell PowerShell module
-
Azure Recovery Services Vault already deployed within the same region as the Session Hosts
Steps
-
From a PowerShell command prompt window, download the Enable-RecoveryServicesSessionHostBackup.ps1 script (this is a single line command)
-
Authenticate against Azure and select subscription if needed
-
Authenticate against WVD Tenant and set the context to the desired Tenant Group
-
Execute the script
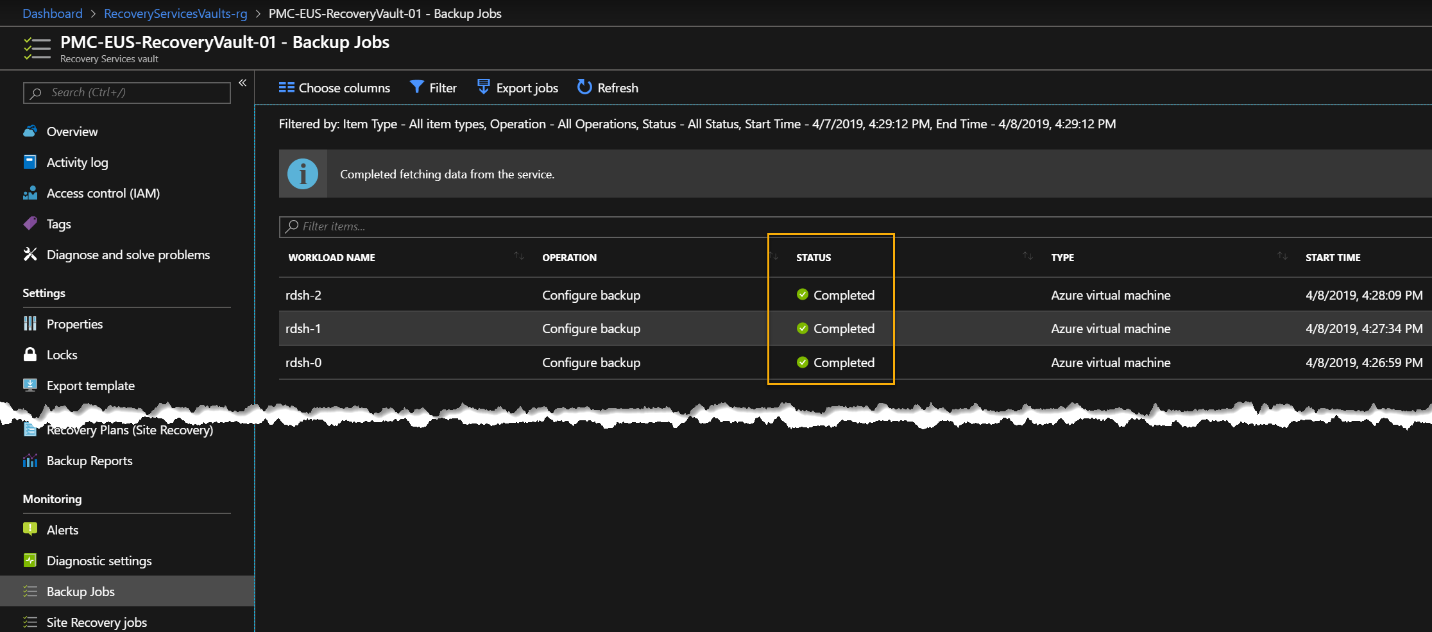
This is a sample result, where one backup job to enable backup will be created per Session Host:

Note: This script allows you to execute it again and it will inform you if VMs are already protected and will not error out, plus will enable to new unprotected VMs.

Checking the results
To make sure you have enabled backup on all Session Hosts, you can check in two places, one will be at the recovery vault and the other way is to check the VM itself
-
Recovery Services Backup Job Status for enabling the VMs
-
Checking backup status directly on Session Host VM
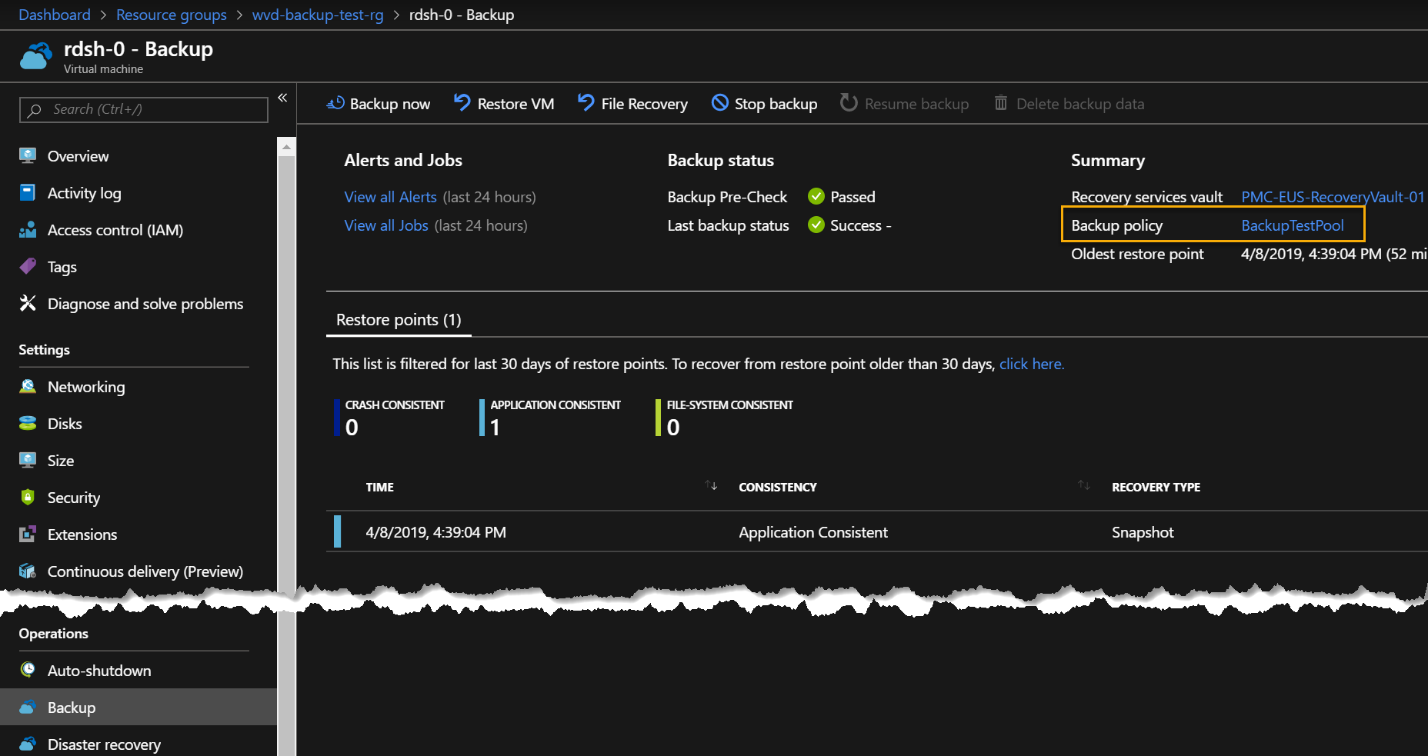
Starting an On-Demand Session Host Backup
As you noticed we applied a backup policy to the Session Hosts, and it will back up our VMs every day but there will be times where you will need to manually or through a script that is triggered by integration with another system using PowerShell. This can be achieved in multiple ways and in this document we are show casing one option using PowerShell and one very basic which is using the Azure Portal backing up the VM by its Backup option.
Backup Based on a User Principal Name from PowerShell
If this backup process is mandatory due to certain compliance regulations, the easiest way to execute this backup is through the PowerShell script below, one of the parameters will be the User Principal Name, then it will identify which Session Host needs to be backed up if the Host Pool is using Persistent Desktop scenario.
-
From a PowerShell command prompt window, download the Enable-RecoveryServicesSessionHostBackup.ps1 script (this is a single line command)
-
Authenticate against Azure and select subscription if needed
-
Authenticate against WVD Tenant and set the context to the desired Tenant Group
-
Execute the script
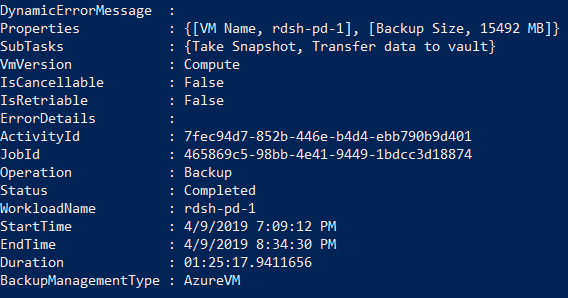
Result screen:

This script also returns each backup job object if you want to perform further operations like checking the backup status, for that, just add a variable before the script, for example:

Note: this script allows you to backup a specific Session Host or all Session Hosts within a Host Pool, for more info on these options, execute:
Get-Help .\Start-SessionHostBackup.ps1in the same folder where your script is located and the help text will show these other options.

To get an updated status from PowerShell by using this object (notice that this could be an array of multiple Session Hosts being backed up by the script, in this case you need to reference the specific array item):
-
Get Recovery Vault reference (parameter values are examples only)
-
Getting an updated summary

-
Getting more detailed information
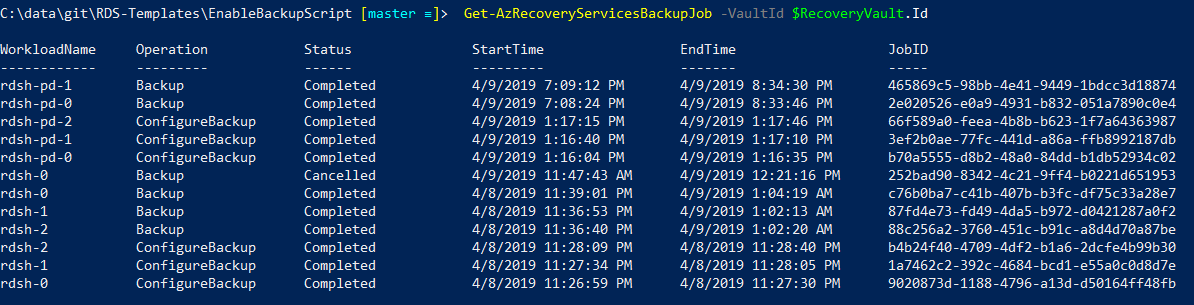
If you don’t have the job id or the job object you can always list all jobs (and possibly apply PS filtering capabilities) to check all our backup jobs:
Manual Backup using the Azure Portal
-
Within the Azure Portal, open your VM resource and click Backup item on your Session Host VM blade
-
Click “Backup now” button
-
Pick a retention period in “Retain Backup Till” date field
-
Click “OK” button

Recovering a Session Host
Similarly, to backup options, there are many ways to restore a VM, to a point where you can restore individual files, the following steps will guide on one of the options which is fully restoring a VM over the existing one. Notice that for this scenario, the VM needs to be in deallocated state.
Recovering an existing Session Host into the same VM
-
Navigate to the Session Host you need to restore within the Portal and then to Backup option
-
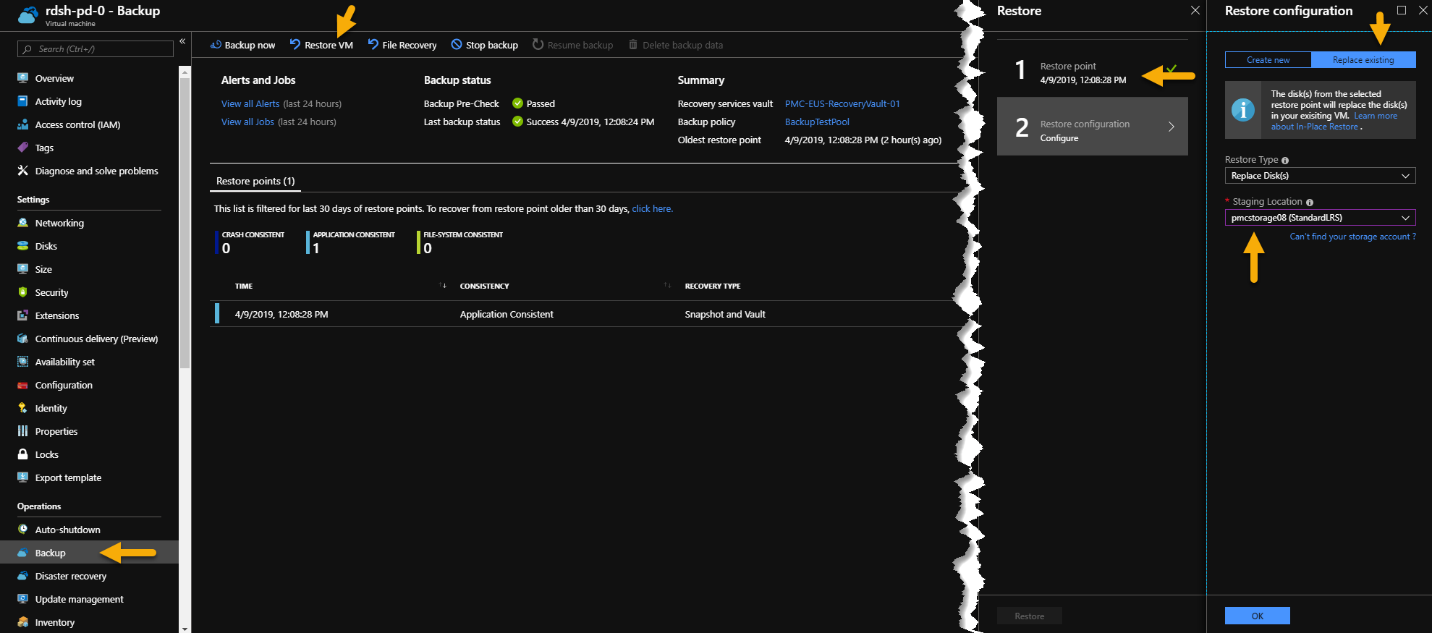
Click “Restore VM” button
-
Select the desired recovery point, if restore point is up to 5 days old this restore will happen from a snapshot which is a quicker method then bringing the data from Recovery Vault.
-
Click “OK” button
-
Select “Replace existing”
-
Select a “Staging Location” (make sure you have a storage account available in the same region as your Session Host)
-
Click “OK” button
-
Click “Restore” button
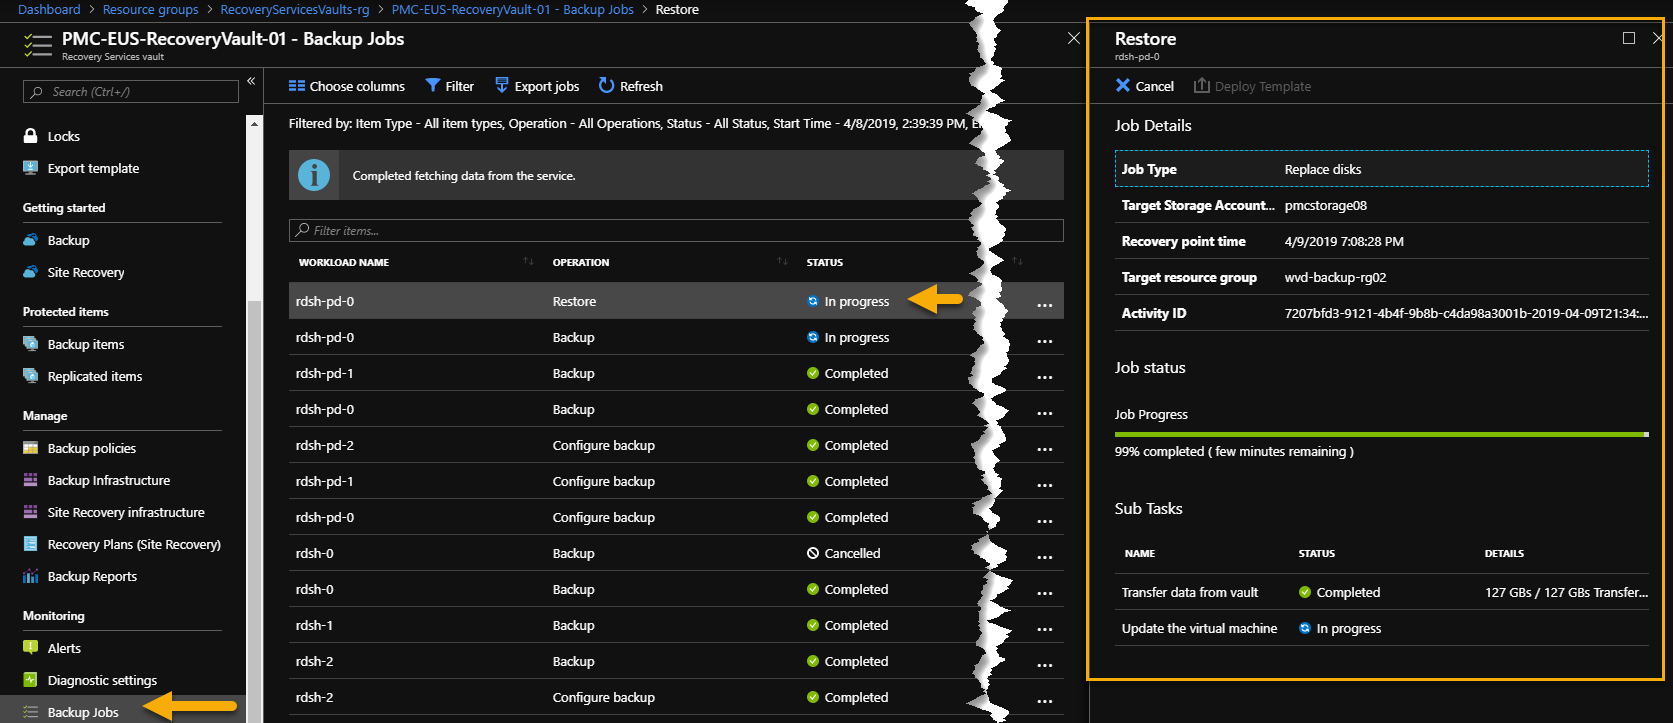
You can monitor the job status from PowerShell as exemplified earlier or monitor it directly in the Portal from the Recovery Services Backup Report item:
Recovering a Session Host that does not exist anymore (e.g. deleted)
In an extreme case where the Session Host was deleted, you can always restore it from the Recovery Vault itself. Follow these steps to recover a completely deleted VM (or even a VM that was decommissioned as part of its lifecycle, e.g. employee left the company):
-
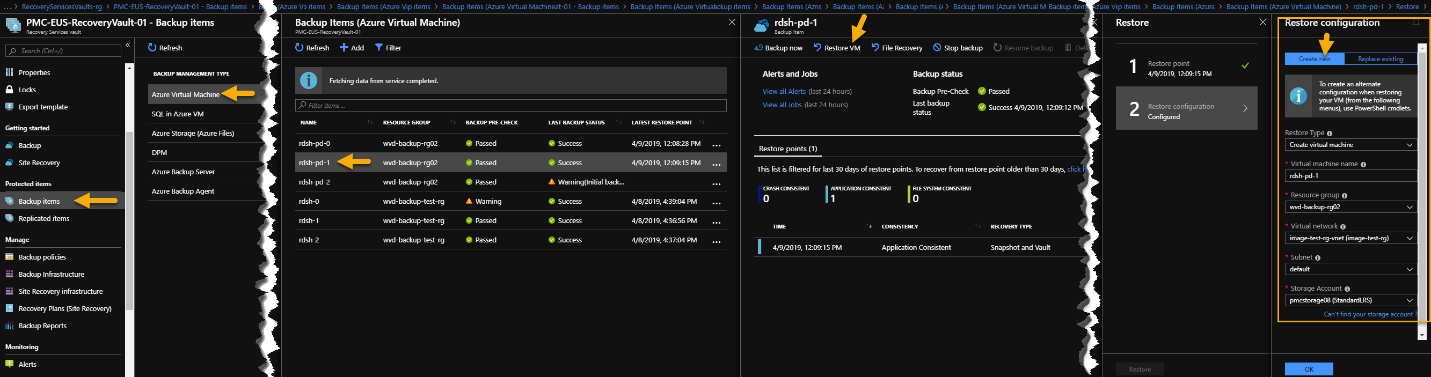
Navigate to your Recovery Vault resource
-
Click “Backup items” item
-
Click “Azure Virtual Machine” from the Backup Management Type list
-
Click <VM Name> that is the Session Host to want to restore
-
Click “Restore VM” button
-
Select the desired recovery point.
-
Click “OK” button
-
Select “Create new” (remember that this is the case where the VM does not exist anymore)
-
Under “Restore Type”, select “Create virtual machine”
-
Type the VM Name
-
Select the same resource group, virtual network, subnet (ideal if replacing an accidentally deleted VM, if this is for compliance purposes, make sure you plan accordingly on where to restore this VM to)
-
Select a “Staging Location” (make sure you have a storage account available in the same region as your Session Host)
-
Click “OK” button
-
Click “Restore” button
Important: if you are restoring a Session Host for compliance purposes, don’t restore in the same production virtual network otherwise you may have conflicts with possibly a VM with same name existing in Active Directory, it also may introduce issues due to computer account staleness in Active Directory as well, make sure you reset the local user administrator password by using Support + troubleshooting-> Reset Password VM option.
For other restore options, please refer to:
Considerations
Azure IaaS VM Backup offers one backup per day, if two are required then Azure Backup Server or System Center DPM (both IaaS based solutions) should be considered since they offer more flexibility in this regard, but the downside is that you will need to architect and manage the infrastructure.
Basic tiering in Azure IaaS VM Backup, Snapshots are kept in a storage account for up to 5 days, after this period, it will be available only from Recovery Vault which makes it less costly but the restore time will take longer, as explained earlier as well, it also supports Local or Geo redundancy, which can be changed only if there is no protected items and backups, if a different tiering type is needed, System Center DPM offers backup to tape option at this time but this is an on-premises solution only.
For more information please refer to:
What are the features of each Backup component?
References
- What is Windows Virtual Desktop?
- Overview of the features in Azure Backup
- About Azure VM backup
- Back up Azure VMs in a Recovery Services vault
- Back up an Azure VM from the VM settings
- Back up a virtual machine in Azure with PowerShell
- Back up a virtual machine in Azure
- Enable and Start Backup Scripts repo